


Are you looking to optimize your Showit website? You’ve come to the right place! This guide to Showit SEO settings is going to give you everything you need to know with step-by-step instructions on how to get your Showit site ranking on Google.
In this Showit SEO settings guide, you’re going to learn…
- Is Showit good for SEO?
- Showit Title Tag and Meta Description
- Showit SSL Certificate
- Showit Page URL Slugs
- Showit URL Redirects
- Showit Text Properties & Text Tags
- Showit Site Design Settings
- Favicon for Showit
- Showit Social Share Image
- Showit Image Optimization (Image File Size)
- Showit Image Alt Text
- Showit Canvas Element Order
- How to connect Showit to Google Search Console
- How to submit your Showit sitemap to Google
- How to submit your Showit WordPress blog sitemap
- Showit and Google Analytics
- How to add Google Analytics (GA4) to Showit
So let’s dive into this ultimate beginner’s guide to Showit SEO settings!
Is Showit good for SEO?
Before we dive into the specific Showit SEO settings, let’s first talk about the elephant in the room…
…is Showit good for SEO?
The simple and easy answer is yes, Showit is good for SEO.
It is one of the many myths about SEO that the website platform you use has an impact on your SEO. Google has 200+ ranking factors it considers like keywords, title tags and meta descriptions, quality of content, and backlinks, for example.
But the website platform you use is not one of Google’s ranking factors.
Google doesn’t care if your site is on Showit, Squarespace, Wix, or WordPress. It cares about the SEO settings of your website and that you took the time to optimize them.
So although the easy answer is that Showit is good for SEO, the website platform you use truly has no impact on your SEO or rankings on Google.
Showit SEO Settings: Showit SEO Tips
Now it’s time to get to the good stuff and I have some great Showit SEO tips for you that will help you easily optimize your website for Google. The SEO settings in Showit are very user-friendly, even if you are not a techy person.
So let’s dive in!
Showit Title Tag and Meta Description
First, let’s talk about metadata, or your Showit SEO title and description.
Metadata is a type of on-page SEO that provides information about a webpage to users and influences how search engines like Google view a website. Metadata consists of 2 parts:
- Title Tags (also known as page titles)
- Meta Descriptions (also known as page descriptions)
And although metadata is a type of on-page SEO, you can’t actually see these elements on your Showit website.
Metadata is added to the HTML code of a website. But don’t get nervous! Most website builders like Showit allow you to add and edit SEO titles and descriptions without having to touch any bit of code.
And actually, you’ve seen title tags and meta descriptions in action!
First, your Showit SEO title appears in the tab of your browser. And if you’ve ever used Google—or any search engine for that matter—the SEO title and meta description are the elements that appear in a Google search result.
Here’s a quick example…

- The large blue text you see is the title tag. Think of title tags as a first impression for the pages of your website.
- The small text below the title tag is called a meta description. Think of meta descriptions as the elevator pitch for your content.
To add your metadata to a page on your Showit site, click on the page in the left-hand navigation panel. Then in the editing panel on the right-hand side, click “SEO Settings.”
You’ll see a space for both the Page Title and Meta Description, so add your metadata there. Oh, and don’t forget to hit “publish” to make these SEO settings live on your Showit site.
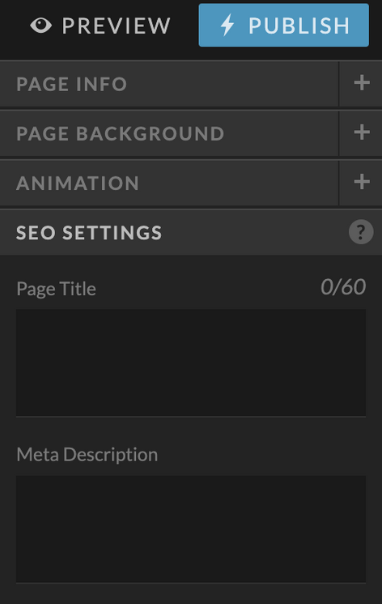
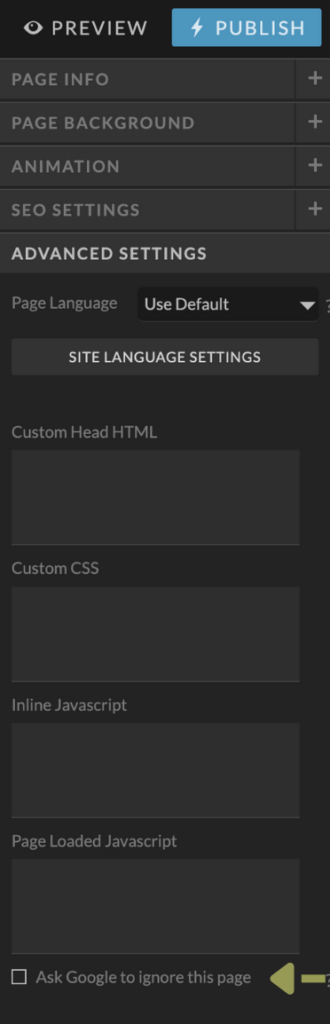
Now, if you have a page that you don’t want Google to crawl, index, and rank in search results—like your Instagram link in bio page, your legal pages, or any checkout or thank you pages—there’s a place in Showit where you can tell Google to ignore the page.
To do this, click on the page in the left-hand navigation panel. Then in the editing panel on the right-hand side, click “Advanced Settings.” At the bottom, you’ll see a small checkbox that says “Ask Google to Ignore This Page.” By clicking this, Google will…well…ignore the page! And it won’t crawl, index, or rank it in search results.
And that’s how you add and edit your page-specific metadata in Showit!
Showit SSL Certificate
Ensuring you have a secure website is a key technical SEO component, and that’s where an SSL certificate comes in.
And I know seeing the word “technical” when talking about SEO can send chills down your spine. But I promise this is the easiest Showit SEO setting there is!
But first, what is an SSL certificate?
SSL is short for Secure Sockets Layer. And an SSL Certificate simply ensures that the connection between your website and the browser is secure for website visitors. That’s it!
There are a couple of easy ways to identify if you have an SSL certificate for your site. First, take a look at your web browser. If you see a lock icon next to your URL, your site is secure!
Another easy way to identify if your site is secure is if you use HTTPS instead of HTTP. This goes hand-in-hand with the SSL Certificate. HTTP stands for Hypertext Transfer Protocol—and the addition of the “S” on the end is what makes the difference. The “S” stands for secure.
And as some nerdy website security info, HTTPS was created nearly 20 years ago back in 1994. The popularity of HTTPS spiked around 2014 when Google began recommending that sites switch from HTTP to HTTPS.
So why is having an SSL certificate for your Showit website important? Does Google value and prefer a secure website?
The answer is YES!
If your site isn’t secure, Google will actually show a not secure warning when you try to access the site or a page of the site. It signals to potential website visitors that the website isn’t secure and their information may be at risk, which provides a very poor user experience.
Having a secure site can also “boost” your SEO rankings. And yes, the quotes around boost are necessary.
When Google started recommending sites switch to HTTPS, they confirmed that websites using HTTPS had the potential to rank higher than those using HTTP, or non-secure websites.
And when you think about it, that makes a lot of sense. A secure website improves user experience and since user experience is a huge ranking factor, it only makes sense that secure websites would rank above non-secure sites.
So how do you get an SSL certificate for your Showit website?
Enabling the SSL certificate for your Showit site is extremely easy and only takes one simple step. No really, it is truly that easy!
All you have to do is ask Showit to enable the SSL certificate and they’ll get it all set up and enabled for you on your site—for free.
Yup, just ask Showit!
You can use the chat feature or if they transferred your site & blog from Squarespace to Showit for you, for example, you’ll be emailing them and can just ask to confirm the SSL certificate is in place. They have one of the best website support teams out there and the process happens incredibly quickly.
I told you enabling an SSL certificate was the easiest Showit SEO setting!
Showit Page URL Slugs
Now let’s talk about setting up your page URL slugs in Showit. The URL settings in Showit are not as customizable as Squarespace, which is a bit unfortunate but it’s absolutely not a deal breaker.
So in Showit when you add a new page, a pop-up appears for you to name the page. It’s completely customizable and you can write essentially whatever you want.
But you want to be careful…
Because whatever your page name is, will automatically become the page URL slug. You cannot edit or adjust this in Showit (at least not yet, I’m hoping this is a feature they add soon).
So if you enter “About” for your page name, your page URL slug will automatically be /about. If you enter “Course Sales Page” for your page name, your page URL slug with automatically be /course-sales-page (which isn’t completely clear and user-friendly).
So although you have the freedom and flexibility to adjust the name of the page, you need to be strategic since it automatically becomes your page URL slug.
URL Redirects in Showit
While we’re on the topic of URLs, let’s talk about how to add URL redirects in Showit.
You can think of URL redirects as detours. They are important from both a user experience and search engine perspective, as neither wants to encounter a dead end, aka a page that no longer exists.
From a user experience perspective, website visitors may instantly close out or leave your site if met with an error. This means the chance of getting the person on your email list or converting them into a client or customer just got a whole lot more difficult.
On the search engine side, the page could drop pretty quickly and significantly in search rankings. Also, any backlinks will also be essentially wasted and not counted as a “digital high five.”
Now, if you want to adjust the URL slug for a general page of your Showit site like your services page for example…you want to set up a URL redirect.
If the page is already live and published, jot down what the current URL slug is; you’ll need that to set up the URL redirect in Showit. Then, go ahead and adjust the URL to what you want it to be instead.
Now it’s time to set up the URL redirect right in Showit—and they make this process pretty darn easy!
In the navigation panel on the left-hand side, click “Site Settings.” Then in the pop-up that appears, you’ll then click “Edit” next to your domain. In the upper right-hand corner, there is a gear icon. Click that and it will take you to the Domain Configuration page where you can set up your URL redirects.
The first text box is where you’ll place the old URL slug. the second text box is where you’ll place the new URL slug. After you enter those hit the “Add” button.
When you’re done entering your redirects you can hit the close button or the “X” in the upper right-hand corner to close the pop-up. And don’t forget to hit “Publish” to make these changes live.
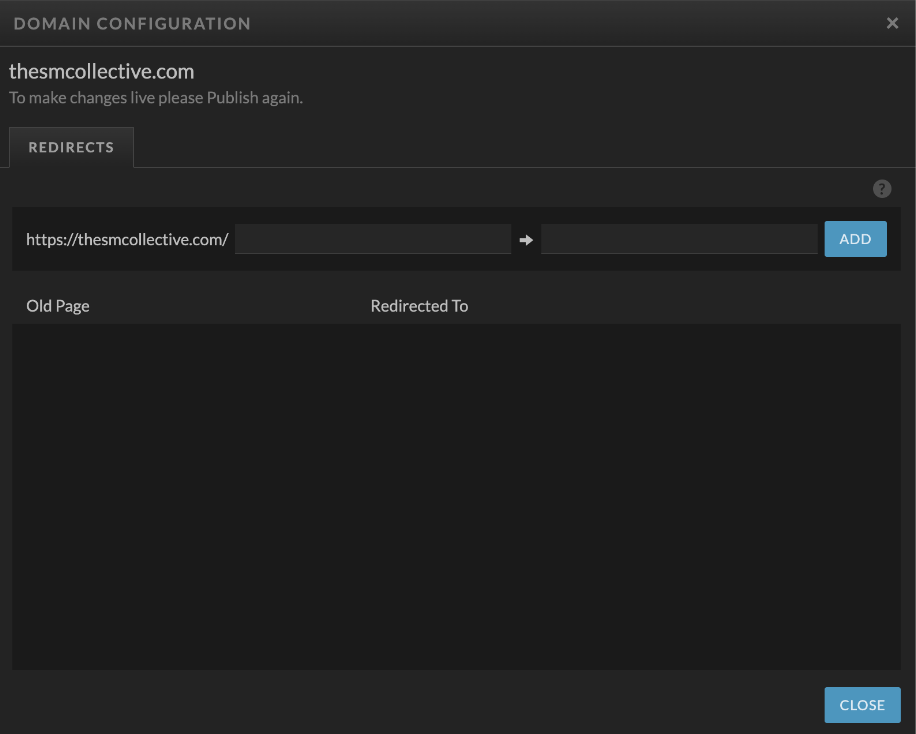
Essentially what this URL redirect in Showit says is “hey internet, anyone who wants to go to Page A, send them to Page B instead please!”
So for example, your redirect could look something like this…
/all-about-me → /about
This basically says…anyone trying to go to this old about page URL of /all-about-me, send them to this new URL that is /about instead.
And there you have it—the world of URL settings and URL redirects in Showit!
Showit SEO Text Properties & HTML Text Tags
Now we’re going to dive into the world of HTML text tags and go over the text property settings inside of Showit. These are often overlooked—or used incorrectly—but they are a critical SEO component to pay attention to.
In the Showit design settings where you set your type styles for desktop and mobile, you’ll see they provide you settings for Title, Heading, Subheading, and Paragraph.
Showit also allows you to edit the HTML tags of your text. This helps search engines like Google identify the importance and even purpose of the text on your page. The HTML text tags that Showit offers include H1, H2, H3, paragraph, and nav.
H1, H2, and H3 are your header tags. H1 is for heading 1, h2 is for heading 2, and h3 is for heading 3s. To relate this to your type styles, your title is for your H1, heading is for your H2s, subheading is for your H3s, and paragraph is for—yup, your paragraphs.
When it comes to your use of headings, each page of your site should have only ONE H1 heading. Let me repeat that…
You should only have ONE heading 1 on each page of your website.
An easy way to remember this, heading 1 = use once.
Your heading 1 is typically the largest heading on your site. For your blog posts (if you’re using the Showit and WordPress blog integration), the title of the blog post is automatically a heading 1 so you won’t add another to any blog posts you create.
Your heading 1 should also come before any other headings on the page. It’s the most important heading that includes the primary keyword you’re trying to rank for. It’s also what Google looks at to help understand the main purpose of the page.
From there, you’ll utilize heading 2s and heading 3s accordingly in order of importance per canvas. You would use H2’s to identify main headings, with H3’s under the H2’s as subheadings, and so on. These remaining header tags are a great place to incorporate secondary or synonym keywords. If you’re able to naturally incorporate your primary keyword into some of these as well—that’s a win-win!
The paragraph text tag in Showit is exactly as it sounds—it’s for all your paragraph text or body copy. Showit lists this as “p” in the text tag options.
The nav text tag is also pretty self-explanatory. The nav text tag in Showit is for your navigation items, be it in your main header navigation, footer navigation, or even your blog navigation.
Now that you have an understanding of text tags, let’s go through how to set your text properties in Showit. And once again, they make it extremely easy!
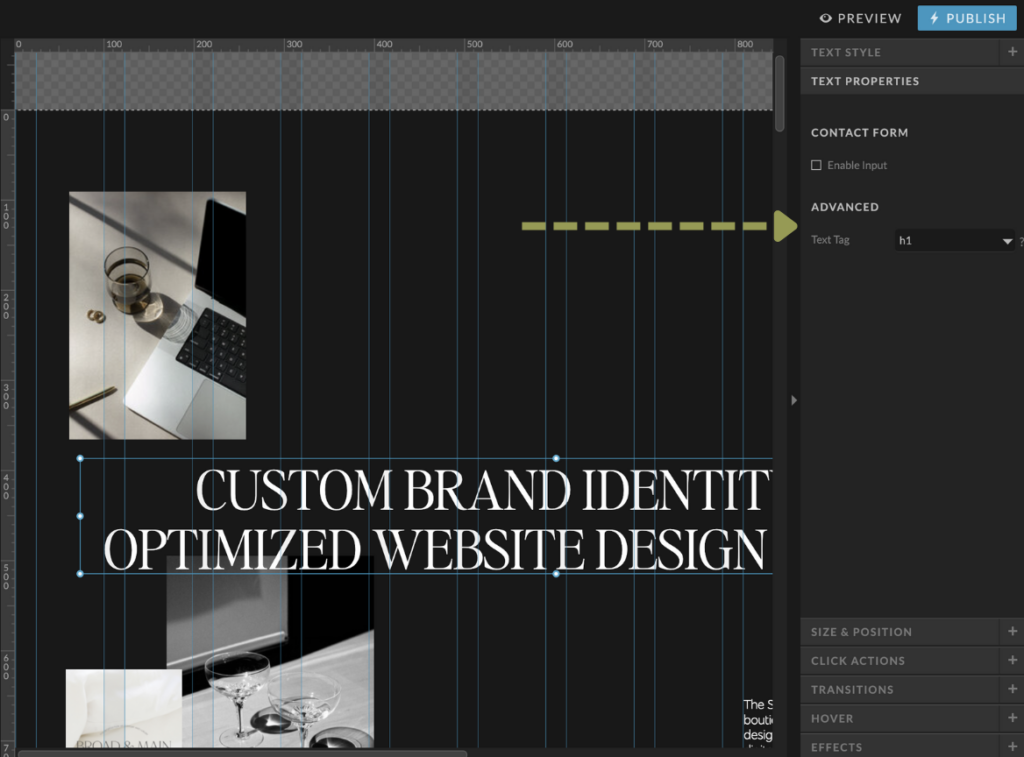
So head to a page of your site and click on a text box. In the editing panel on the right-hand side, click “Text Properties.” You’ll see a heading that says “Advanced” and it lists “Text Tag” with a dropdown menu below it.
This is where you’ll select the HTML text tag! It really is as easy as that.
Showit Site Design Settings for SEO
Next, we’re going to talk about some design settings to ensure you have in place on your Showit website. They aren’t necessarily SEO settings, but they do impact how your site is represented in search results and when shared on social media.
Favicon for Showit
First up, let’s go through how to add a favicon to your Showit site. And if you’re wondering what the heck a favicon is…I’ve got you covered!
Yes, favicon is a weird word but it’s simply your browser icon. And no, it doesn’t have an effect on your SEO but it does make your site look more official in search results.
A favicon is a small, branded graphic that appears in the tab of a browser next to your title tag. Your favicon also appears in search results, both on desktop and mobile, next to your website title and URL
Because the favicon is such a small element, you don’t want anything too complicated or detailed for this space. If you have a monogram mark or a brand icon, those are great options to include here. You could even include an on-brand emoji if it fits your brand’s style. Or perhaps just opt for one of your brand colors in a basic circle shape to keep things simple.
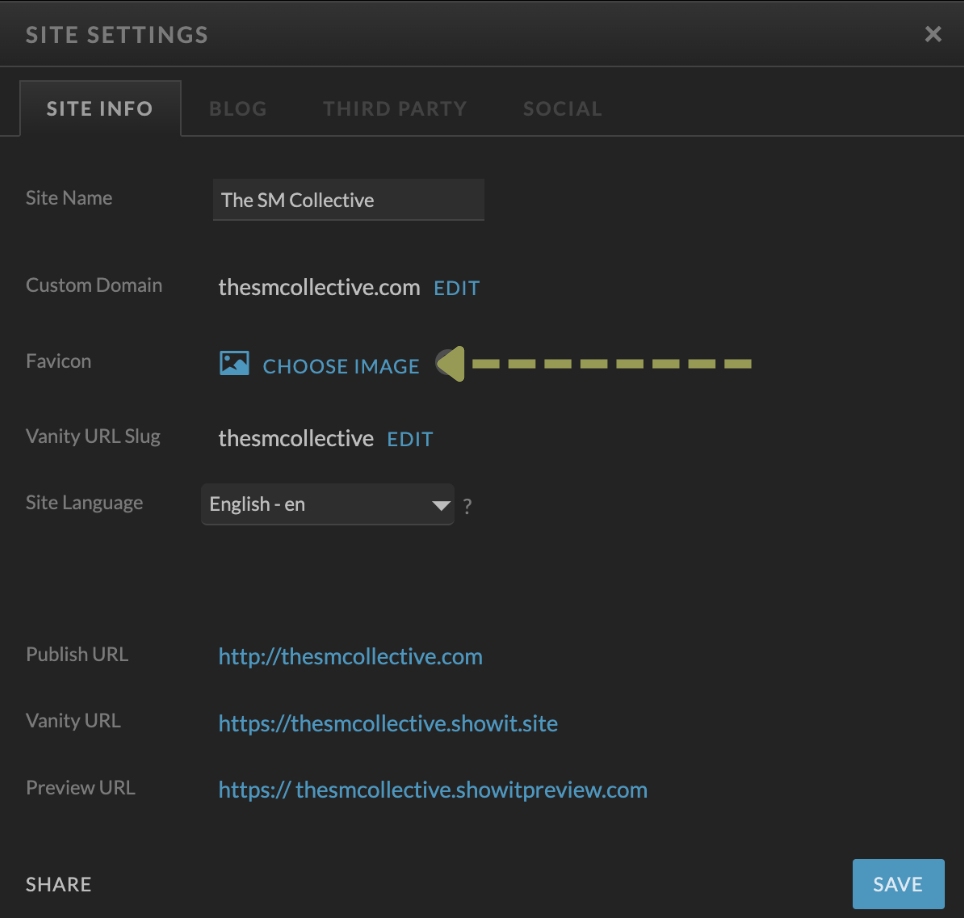
Here’s how to add your favicon in Showit…
- In the navigation panel on the left-hand side, click “Site Settings”
- In the pop-up that appears you’ll see where it says “Favicon”—it’s the 3rd option down on the pop-up. You’ll click “Choose Image” and then select the PNG file of your choosing.
- After it’s loaded, don’t forget to hit “Publish” in the upper right-hand corner to activate and make the favicon live.
Showit Social Share Image
Next, you want to add a social sharing image. When a link to your website is shared on social platforms like Facebook or LinkedIn, for example, Showit will use the social sharing image to represent the content.
The social sharing image is often an overlooked and forgotten element but it’s a great opportunity to incorporate more of your branding to keep everything cohesive. You don’t need anything fancy or overly designed here. It could simply be your logo on one of your brand colors.
Now with Showit, the social sharing image is added on a page-by-page basis, which is the opposite of Squarespace where you have the option to add a site-wide social sharing image.
So to add a social sharing image in Showit, you’ll select one of your pages—we’ll use your homepage as an example. So you click on that page in the left-hand navigation to select it.
Once the page is selected, you’ll head to the editing panel on the right-hand side and select “SEO Settings.”
You’ll see the option at the bottom that says “Share Image”—click where it says “Choose Image” and select the image you want to use for your social sharing image. You can select from your media library if it’s already uploaded or you can add the file to your media library and then select it.
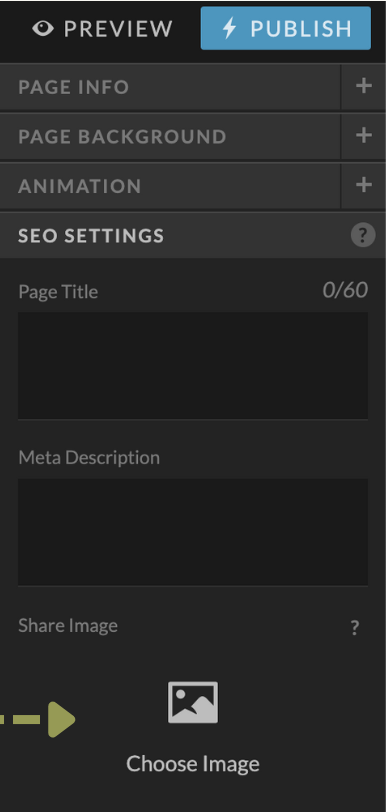
You’ll then repeat these steps for each page of your site–and yes, you can use the same image for all of your pages. Again, don’t forget to hit publish to make the social sharing image live on your Showit website.
Showit SEO Settings for Image Optimization
Next, let’s talk about image optimization and optimizing your images in Showit.
As a little insider tip, Showit actually optimizes your JPG images when you upload them into your media library. Their “image robots” as they call them, automatically deliver resized versions of your JPG images to your website visitors based on what device they’re viewing your site with.
Pretty cool, right?!
Now they don’t resize all image file types, they only resize JPG image files. So be sure to pay attention to what file type you are uploading.
Showit recommends (and so do I) to only use PNG image files for things like your logos or brand icons that you want to have a transparent background for. All other images on your site should be JPG image files.
Now although Showit does optimize your JPG images, it doesn’t hurt to resize and compress your images beforehand just to make sure. It’s one of those “comforting to know” types of things so that if you happen to forget to resize an image or 2, you at least know that the image has been optimized a bit by Showit.
So what is the ideal image size for Showit?
They recommend resizing your original images to 3500px on the long edge to make the uploading process faster. You can upload original-sized image files but they will take longer to upload.
In regards to the ideal image file size for Showit, your goal is to keep image files at a max of 500kb, with an ideal goal of 300kb. Not only does a smaller image file size help to improve your page speed, but it provides an improved user experience and is one of Google’s ranking factors.
And while we’re on the topic of the ideal image size for Showit, they note that the DPI resolution doesn’t really matter but you can set it to 72 if necessary.
Showit SEO: How To Change Alt Text for Images
And while we’re on the topic of images, you want to remember to add your image alt text. But what is image alt text?
Simply put, image alt text describes the contents of an image and is used by screen readers and Google to know and understand what an image is.
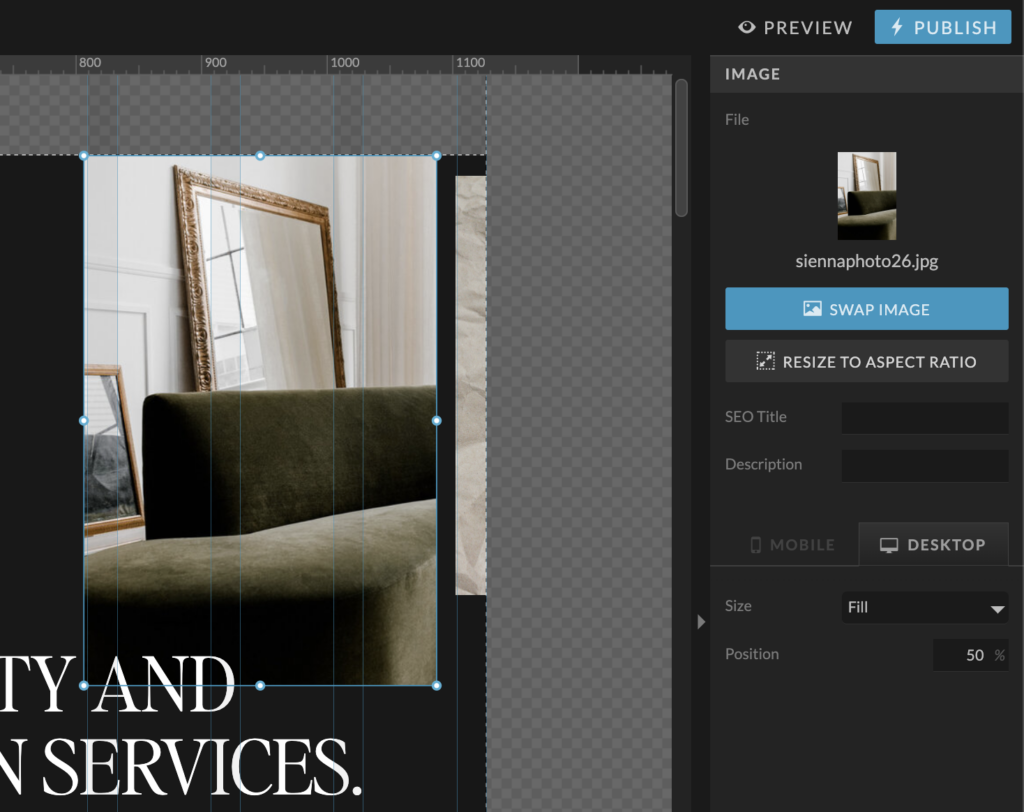
To add the image alt text to an image in Showit, simply click on an image on your Showit site. In the editing panel on the right-hand side of the screen, you’ll want to make sure you’re in the “Image” tab which is at the very top.
Showit will display a small preview of the image and below that, you’ll see spaces for SEO Title and Description. We’ll get to the Showit SEO Title for images in just a minute. I want you to focus on the Description box right now—this is where you’ll put your image alt text.
Now, the SEO title for your images can be thought of in the same way as title tags for the pages of your site. The Showit SEO title for images is what gets displayed in the image search results on Google.
You want to keep your image SEO title short and simple yet descriptive. It isn’t as important as the image alt text or description. But since Showit gives you the option to optimize this, you might as well take advantage of it for your Showit SEO!
Organizing Your Showit Canvas Elements for SEO
Now we’re going to talk about Showit canvases. More specifically, the order of canvas elements in Showit, and what the heck it has to do with your SEO.
I will say, this is something that I often see missed or overlooked, be it from Showit designers or in Showit templates. Not paying attention to these can have a significant and negative impact on your SEO and how Google reads your site.
And what I’m going to go through will absolutely seem like a tedious process, 10000%, especially if you had no idea about this. But I promise you, take the time to get everything in the correct order—you’ll be so glad you did!
So with Showit, the pages of your site are built with canvases. Canvases are essentially the sections that make up a page of your site. They also offer the option to make a canvas a site-wide canvas, meaning that you can duplicate it with just a few clicks on multiple pages across your site.
Now within the canvases are various elements—the text, images, buttons, logos, icons, etc that you add to build each individual section of a page.
Did you know that the order of the elements within each canvas matters? And the order matters A LOT!!
The order matters because it becomes the HTML code that gets read by Google. And because of mobile-first indexing, Google focuses on the HTML code for the mobile design not the desktop.
Let’s bring this to life a bit…
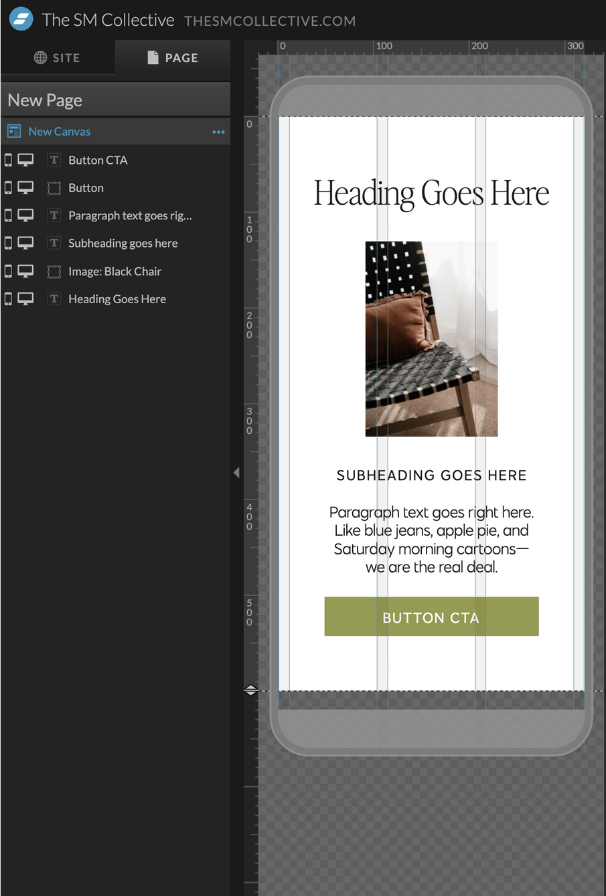
When you add a new element within a canvas in Showit, it automatically adds it to the top of the canvas. You may not necessarily add your elements in any logical order, you’re just working on designing a beautiful site.
Say I add a rectangle element that I’m going to use for my button, then a subheading text element that I’ll use for the button CTA in this section. Then I add a heading text element, a paragraph text element, oh, and a subheading text element, and then I add an image.

As you can see, Showit adds the element you added last to the top. The image was the last thing I added so it’s appearing as the first element in the canvas with the rectangle element for the button that I added first as the last element.
You then put on your designer hat and arrange those elements on desktop and then you spend some time arranging the design on mobile. It looks beautiful so you hit publish.
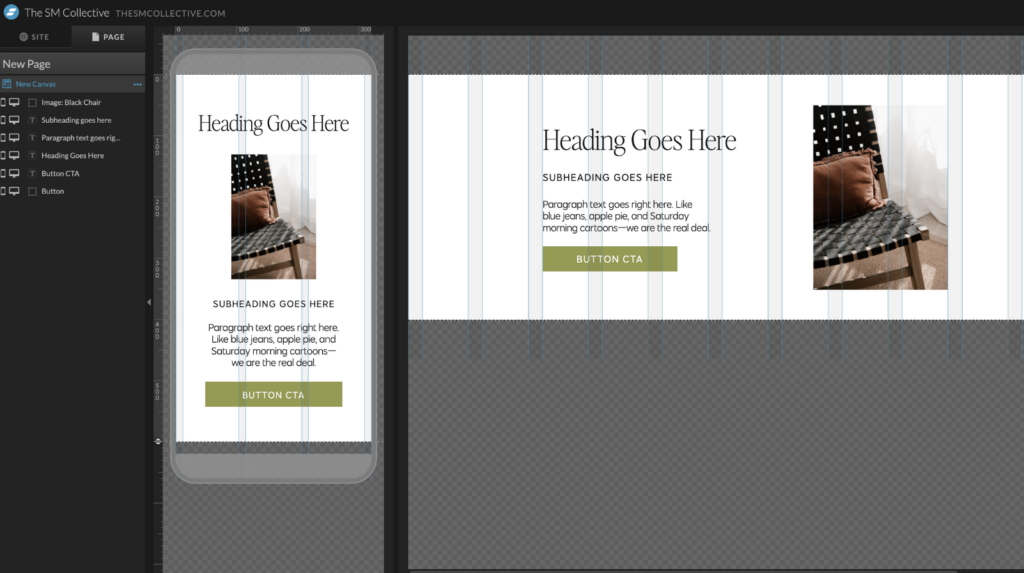
You never rearranged the elements within your canvas—or even thought or knew to do so—so now Google is reading the code incorrectly. If we look at the DESIGN of the mobile site, the order of the design is…
- Heading text
- Image
- Subheading text (that you’re using for the actual subheading)
- Paragraph
- Rectangle
- Subheading text (that you’re using for the button text)
But if we look at the canvas ELEMENT order…it doesn’t match the design. So Google is reading the site as…
- Rectangle
- Subheading text (which is actually your button text)
- Heading text
- Paragraph
- Subheading (which is your actual text subheading)
- Image
Now you might be thinking, oh—easy fix! I’ll just swap the order of the canvas elements to match that of the design. So I’ll put the heading text first, then the image, then the subheading text next, and so on and so forth.
Though that logically sounds correct, it’s actually not.
The order of your canvas elements needs to be OPPOSITE from the mobile design itself. Let me repeat that—the order of your canvas elements needs to be OPPOSITE from the mobile design.
So you’re essentially thinking backward here.
This means the element order of this canvas design based on the MOBILE design of the site should be…
- Subheading (the one for your button text)
- Rectangle
- Paragraph
- Subheading (for your actual subheading)
- Image
- Heading
It’s sort of like a tongue twister right?!
And as an added tip, this is why I recommend renaming your elements so that you know exactly what they are and can ensure they’re in the proper order. So in this example, instead of having 2 subheading elements, I’d rename the one being used for the button text as “button text” or “button CTA.” I’d also rename the rectangle element to “button” just to keep things very clear.
So let’s recap this, I know it’s a lot to wrap your brain around!
- Showit puts elements you add to a canvas in order from most recently added to the first element added.
- You then design the canvas on desktop and on mobile.
- BEFORE you hit publish, you have to take a look at the order of the elements in each canvas and ensure they match the mobile design but in reverse. (so if you’re heading is at the top of the canvas from a design standpoint, it would go at the bottom of the elements list). And to reorder the elements within a canvas, simply click and drag the element.
Again, I see this overlooked SO much in the Showit space! This hurts my soul because by not ordering your elements correctly, Google could misread your site or worse, not understand it at all.
Showit and Google Search Console
Now we’re going to talk about one of my favorite SEO tools from Google—Google Search Console. For a free tool, Google Search Console provides you with a wealth of knowledge about your site.
With Search Console, formerly known as Google Webmasters Tools, you’re able to track the performance of your website on Google and identify or troubleshoot any errors. You’re able to monitor how your site is performing in organic Google search results, and what you can do to improve the pages of your site to bring in even more quality traffic.
If you want to learn more about this amazing free tool, I have a great beginner’s guide to Google Search Console that you’ll want to check out!
So now let’s talk about how to connect Google Search Console with your Showit website.
But first, you need to prep your Showit site…
- If pages of your site that you want to show up on Google are password protected, you’ll want to remove them. Passwords prevent Google from crawling and indexing your site.
- If you are using a third-party domain like GoDaddy, ensure that the domain is properly set up and connected. These connections can sometimes take 24-72 hours, so be sure to give yourself ample time.
- Ensure that your site is live and not a trial site, as trial sites are hidden from search engines like Google.
- To set up Google Search Console you will need a Google account which is essentially a Gmail account.
Once your Showit site is prepped, it’s time to add your site to Search Console…
- Log in to Google Search Console and click “Add Property”
- A pop-up will appear for you to select the property type: domain or URL prefix. I suggest going the domain route here. So simply copy and paste your homepage URL—or just type it in the “Domain” field. So if I was adding my site, I would put thesmcollective.com in the domain field.
- Then hit continue.
- Then you’re essentially going to verify ownership of your site. If you have Google Analytics already set up and connected to your site, this verification can happen automatically. If not, you may be prompted to access the DNS settings of your domain and site. And don’t worry—they’ll walk you through exactly what to do and what information to enter where on the backend of your site.
And that’s it! It really is so easy to connect and verify your Showit website with Google Search Console.
Submit Your Showit Sitemap To Google Search Console
So now that you’ve connected & verified your Showit site with Google Search Console, it is time to submit your Showit sitemap. Submitting your sitemap allows Google to see every page on your website that is available for the public to view and access, including URLs and image metadata.
One thing I want to note—if you’re using the Showit and WordPress blog integration, you’re going to have 2 sitemaps to submit: one for your Showit site and one for your blog posts on WordPress. The process is the same for both but just a heads-up that you’ll be submitting 2 sitemaps if you have the Showit and WordPress blog integration.

To submit your Showit sitemap, follow these easy steps…
- Navigate to your Google Search Console account and ensure that your website is listed in the dropdown in the upper left-hand corner.
- In the dashboard panel on the left side, select Sitemap.
- Enter your Showit sitemap URL in the available space. Your Showit sitemap URL is simply https://yourdomain.com/siteinfo.xml
- Click Submit.
And that’s it! It really is that easy to submit your Showit sitemap to Google.
Submit Your Sitemap for Your WordPress Blog Posts
Now let’s go through how to submit your sitemap for your WordPress blog posts. You’ll follow these steps if you’re using the Showit and WordPress blog integration.
To submit your WordPress blog sitemap, you’ll follow these steps…
- Navigate to your Google Search Console account and ensure that your website is listed in the dropdown in the upper left-hand corner.
- In the dashboard panel on the left side, select Sitemap.
- Enter your sitemap in the available space. For your WordPress blog posts, your sitemap is simply https://yourdomain.com/sitemap_index.xml
- Click Submit.
And that’s it! It really is so easy to submit your WordPress blog sitemap to Google.
Showit and Google Analytics
Let’s go through how to connect your Showit site with Google Analytics. And like most things with Showit, they make it really, really easy to do!
Google Analytics, or GA for short, is a free tool from Google that allows you to track everything you could ever want to know about the visitors and traffic on your website. Google Analytics provides you with more than just data on how many people are coming to your site overall. You’re able to understand the user themselves and their behavior as they navigate your site.
But there’s an important element I want to point out. Google Analytics currently has 2 types of properties: Universal Analytics (UA) and Google Analytics 4 (GA4).
The good news is, you only need to connect one of these to your site—and I’ll tell you which in just a minute! The not-so-good news…
…is that Google is actually sunsetting or getting rid of Universal Analytics in June of 2023, making Google Analytics 4, or GA4, the new queen bee.
So what does this mean for you?
If you don’t have a Google Analytics account, make sure you set up your GA4 account now. And if you have a Google Analytics account but only UA, be sure to add on a GA4 property ASAP. Google Analytics now has a setup assistant that you can access in the Admin settings and it only takes a few clicks to do so.
How to Set Up Your Google Analytics GA4 Account
First up, we’re going to go through how to set up GA4 for the first time. These steps are for you if you’re new to Google Analytics and don’t already have an account connected to your site.
- To create your account, go to analytics.google.com and click the blue button to get started for free—all you need is a Google account which simply means a Gmail.
- You’ll then set up the basics of your account…
- For the account name, I recommend your business name.
- Then you’ll name the website that you’ll be tracking. And if you’ll be tracking different websites, it’s extremely important to name them correctly.
- Add the URL for your website
- Select a category that fits and aligns best with your business.
- And then select your timezone
- From there, you’ll select what data you are personally willing to share with Google. This is a personal preference and up to you.
- Then you’ll agree to their terms of service.
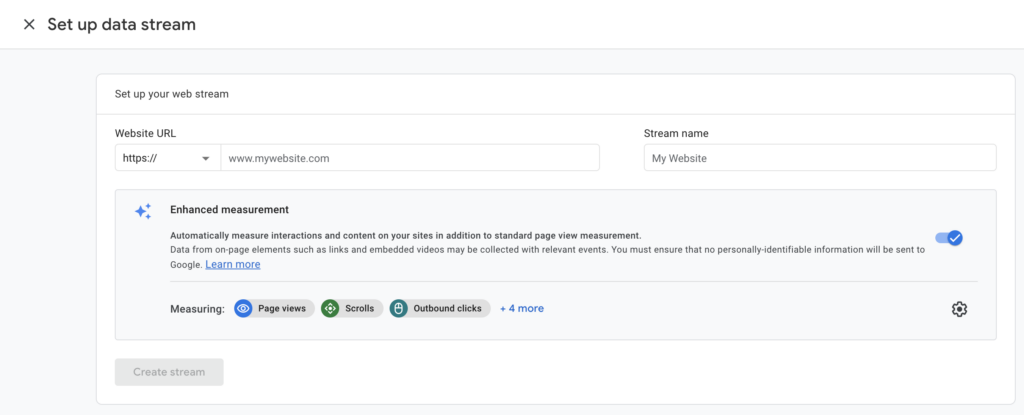
- When it prompts you had Data Streams, you’ll want to select “web” here. You’ll have the option to enable or disable enhanced measurements. I recommend enabling this as it automatically collects page views and other events. You can always go back and disable this down the road.
Now, the second way to set up GA4 is to add it to an existing UA property. The good news is, there’s a GA4 Setup Assistant that will add a GA4 property alongside your existing UA property which makes this extremely easy!
So here’s what you’ll do to add a GA4 account to your existing UA property…
- Log in to your Google Analytics account
- In the lower left-hand corner click where it says “Admin” — you’ll see a gear icon next to it.
- Then in the Account column, make sure that your account and site are selected.
- In the Property column, select the UA property that is currently collecting data for your website.
- Under that same Property column, you’ll see an option for “GA4 Setup Assistant”—it should be the first option under the Property column; click that.
- When prompted, click the blue “Get Started” button where it says “I want to create a new Google Analytics 4 property.” In most instances, Google Analytics will be able to reuse your existing Universal Analytics tagging for your new GA4 property. If not, click the blue button that says “Create and Continue” in the pop-up that appears and follow the steps accordingly.
And there you have it! Creating your GA4 account takes just a few steps whether you’re brand new to Google Analytics or you’re adding GA4 to your existing UA account.
How to Add Google Analytics to Showit
Now let’s go through how to add Google Analytics to your Showit website. And it’s really very easy!
So to connect Google Analytics to your Showit site, you’re adding the GA4 measurement ID. For GA4 properties, the code starts with G- and is called a measurement ID.
And here are the steps to find your GA4 measurement ID…
- Log in to your Google Analytics account. If you have both a UA and GA4 account, be sure to select GA4.
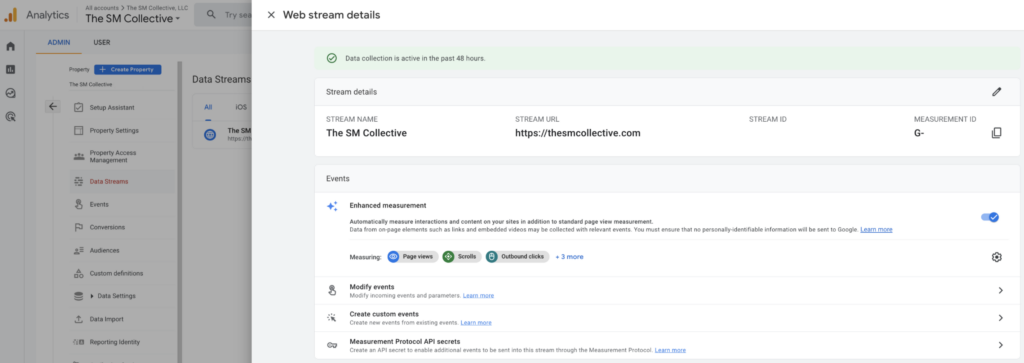
- In the lower left-hand corner, click “Admin” next to the gear icon.
- Under the Property column, click “Data Streams”
- Click “Web” and then click where you see your website URL and property name. When you hover over it the background will turn from white to grey
- In the pop-up that appears you’ll see in the top row of info on the right-hand side, it says “Measurement ID”—this is what you’ll need to copy. It should start with “G-” followed by a string of 10 letters and numbers. So again, be sure to copy your measurement ID.
Back to adding your Google Analytics GA4 measurement ID to Showit…
- Click the “Site Settings” option in the left-hand navigation panel.
- In the pop-up that appears, you’ll click the “Third-Party” tab at the top.
- Here you’ll see options to add your Google Analytics tracking codes. Again, you only need to add your GA4 measurement ID. And Showit even states this in the description text at the top of the pop-up.
- After you’ve added the measurement ID, hit “Close” in the bottom left-hand corner of the pop-up. Don’t forget to hit the “Publish” button, too.

And that’s it! I told you it was really easy to do!
That wraps up your guide to Showit SEO settings! I hope you feel confident in optimizing your Showit site after learning these key Showit SEO tips.
And if you’re looking to learn more about SEO for your Showit site, I’ve got just the things for you! Sign up for the in-your-inbox guide to the basics of SEO, or check out this beginner’s guide to SEO. And if you’re ready to take control of your Showit SEO, check out my signature SEO course, The SEO Blueprint™.
Did you love this post? Share it!
Hey there, I'm Stepf—Google Superfan & Passionate Educator
And the showit website designer and seo strategist you’ve been looking for
Through strategic Showit website design and done-for-you search engine optimization, I work with innovative and creative business owners like you to build magazine-worthy websites that effortlessly attract your ideal client—so much so that they’ll never want to leave.
Get to know me


